Easy Guitar Chords Arranged for Beginners
The Neighbourhood (or THE NBHD) burst onto the scene with their hit single “Sweater Weather”. This tune is from their 2013 debut album, I Love You. The song was written by group members Jesse Rutherford, Zach Abels and Jeremy Freedman and it reached number one on the Billboard Alternative Songs chart in June 2013. “Sweater Weather” logged eleven non-consecutive weeks at the top of that chart.
The Neighbourhood is an indie American rock band that was formed in Newbury Park, California in 2011. The band is made up of vocalist Jesse Rutherford, guitarists Jeremy Freedman and Zach Abels, bassist Mikey Margott, and drummer Brandon Alexander Fried.
Useful links:
Song Specs
 Title: Sweater Weather
Artist: The Neighbourhood
Songwriters: Jeremy Freedman / Jesse James Rutherford / Zach Abels
Album: I Love You.
Key: C (with capo at the 3 fret)
Tempo: 124
Chord Progression: C–Am–Em–G–D
Accompaniment Technique: First-Position Chords, Targeted Strumming Patterns and Pulsing
Playing Tips
Here are some helpful tips to keep in mind that will help you learn the tune faster while giving you some ideas for how to approach performing it. I provided some useful links above and I’ll take you through the chords, accompaniment patterns, song form and a chord chart. Everything you need to get started playing this tune.
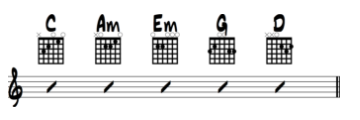
Sweater Weather Chords
| Chords | C | Am | Em | G | D |
| Progression | I | vii | ii | V | II |
“Sweater Weather” is gonna force us to make some decisions as to how to approach this for an acoustic guitar. The arrangement uses a driving drumbeat and electric guitar textures. The vocals and vocal rhythm propel the song so the acoustic part that we create need to support the vocal line.
The chords are all in the first position and shouldn’t create too much of a problem. The song is in the key of Eb but we’ll be using a capo at the 3rd fret and thinking in the key of C.
We’re also gonna approach this from a targeted-strumming standpoint while adding some pulsing to create texture. The chord progression is repetitive so we need to focus on different strumming concepts in order to keep the song moving forward. However, I do encourage to approach the song however you see fit. Use my suggestions as a starting point.
Accompaniment Techniques
I’ve broken down my approach to this tune into three basic techniques that follow the song form. I use a strumming technique that I’ll describe below. But, the basic idea is to create different moods from section to section.
The song is made up of three parts: verse, chorus and bridge. Here’s the basic techniques that I aim for:
- Verse: Targeted strumming and pulsing. This is free to interpret however you see fit. I’m going for a combination of eighth-note and sixteenth-note strumming patterns and I use pulsing to create a more rhythmic feel.
- Chorus: This is simple whole-note strums.
- Bridge: I add a bit of a shuffle lilt as the rhythmic feel completely changes.
Targeted Strumming Technique
Targeted strumming can also be referred to as the boom-chick or boom-chicka technique. It uses an alternate (down and up) strumming technique. Here’s the breakdown:
- The “boom” is the bass played with a downstrum.
- The “chicka” is the higher part of the chord also played with alternating strums (down then up).
- Downstrum on “chick” and the upstrum on “a”.
There’s a boom-chick technique that’s the basic version of the boom-chicka. And, the boom-chick only uses down strums: bass-chord, bass-chord; or, boom-chick, boom-chick.
When hitting the bass (boom), you aim for the lower part of the chord (or the bottom three strings). Then, for the chord (chick), aim for the higher three strings.
Also, you don’t need to strum too hard. Brush the strings and try to recreate that bouncy feel that is a key component of the song.
Why I refer to this as targeted strumming is because I’m only using the boom-chick as a starting point. I’ll freely interpret the rhythm that I’m going for and that’s based on the drum pattern that I hear in my head.
Pulsing
The pulsing technique is a left-hand technique that is used to create a more percussive feel and will help you create the bouncy groove that makes people tap their feet, bob their heads and shake their booties.
Fret the chord as you normally would. Then, after you strum, release the pressure of your frethand without letting go of the chord position. The trick is to maintain contact with the strings as you pulse. Open chords are tricky to pulse because of the open strings. But, keep at it and you’ll find that it’ll quickly become one of your go-to techniques.
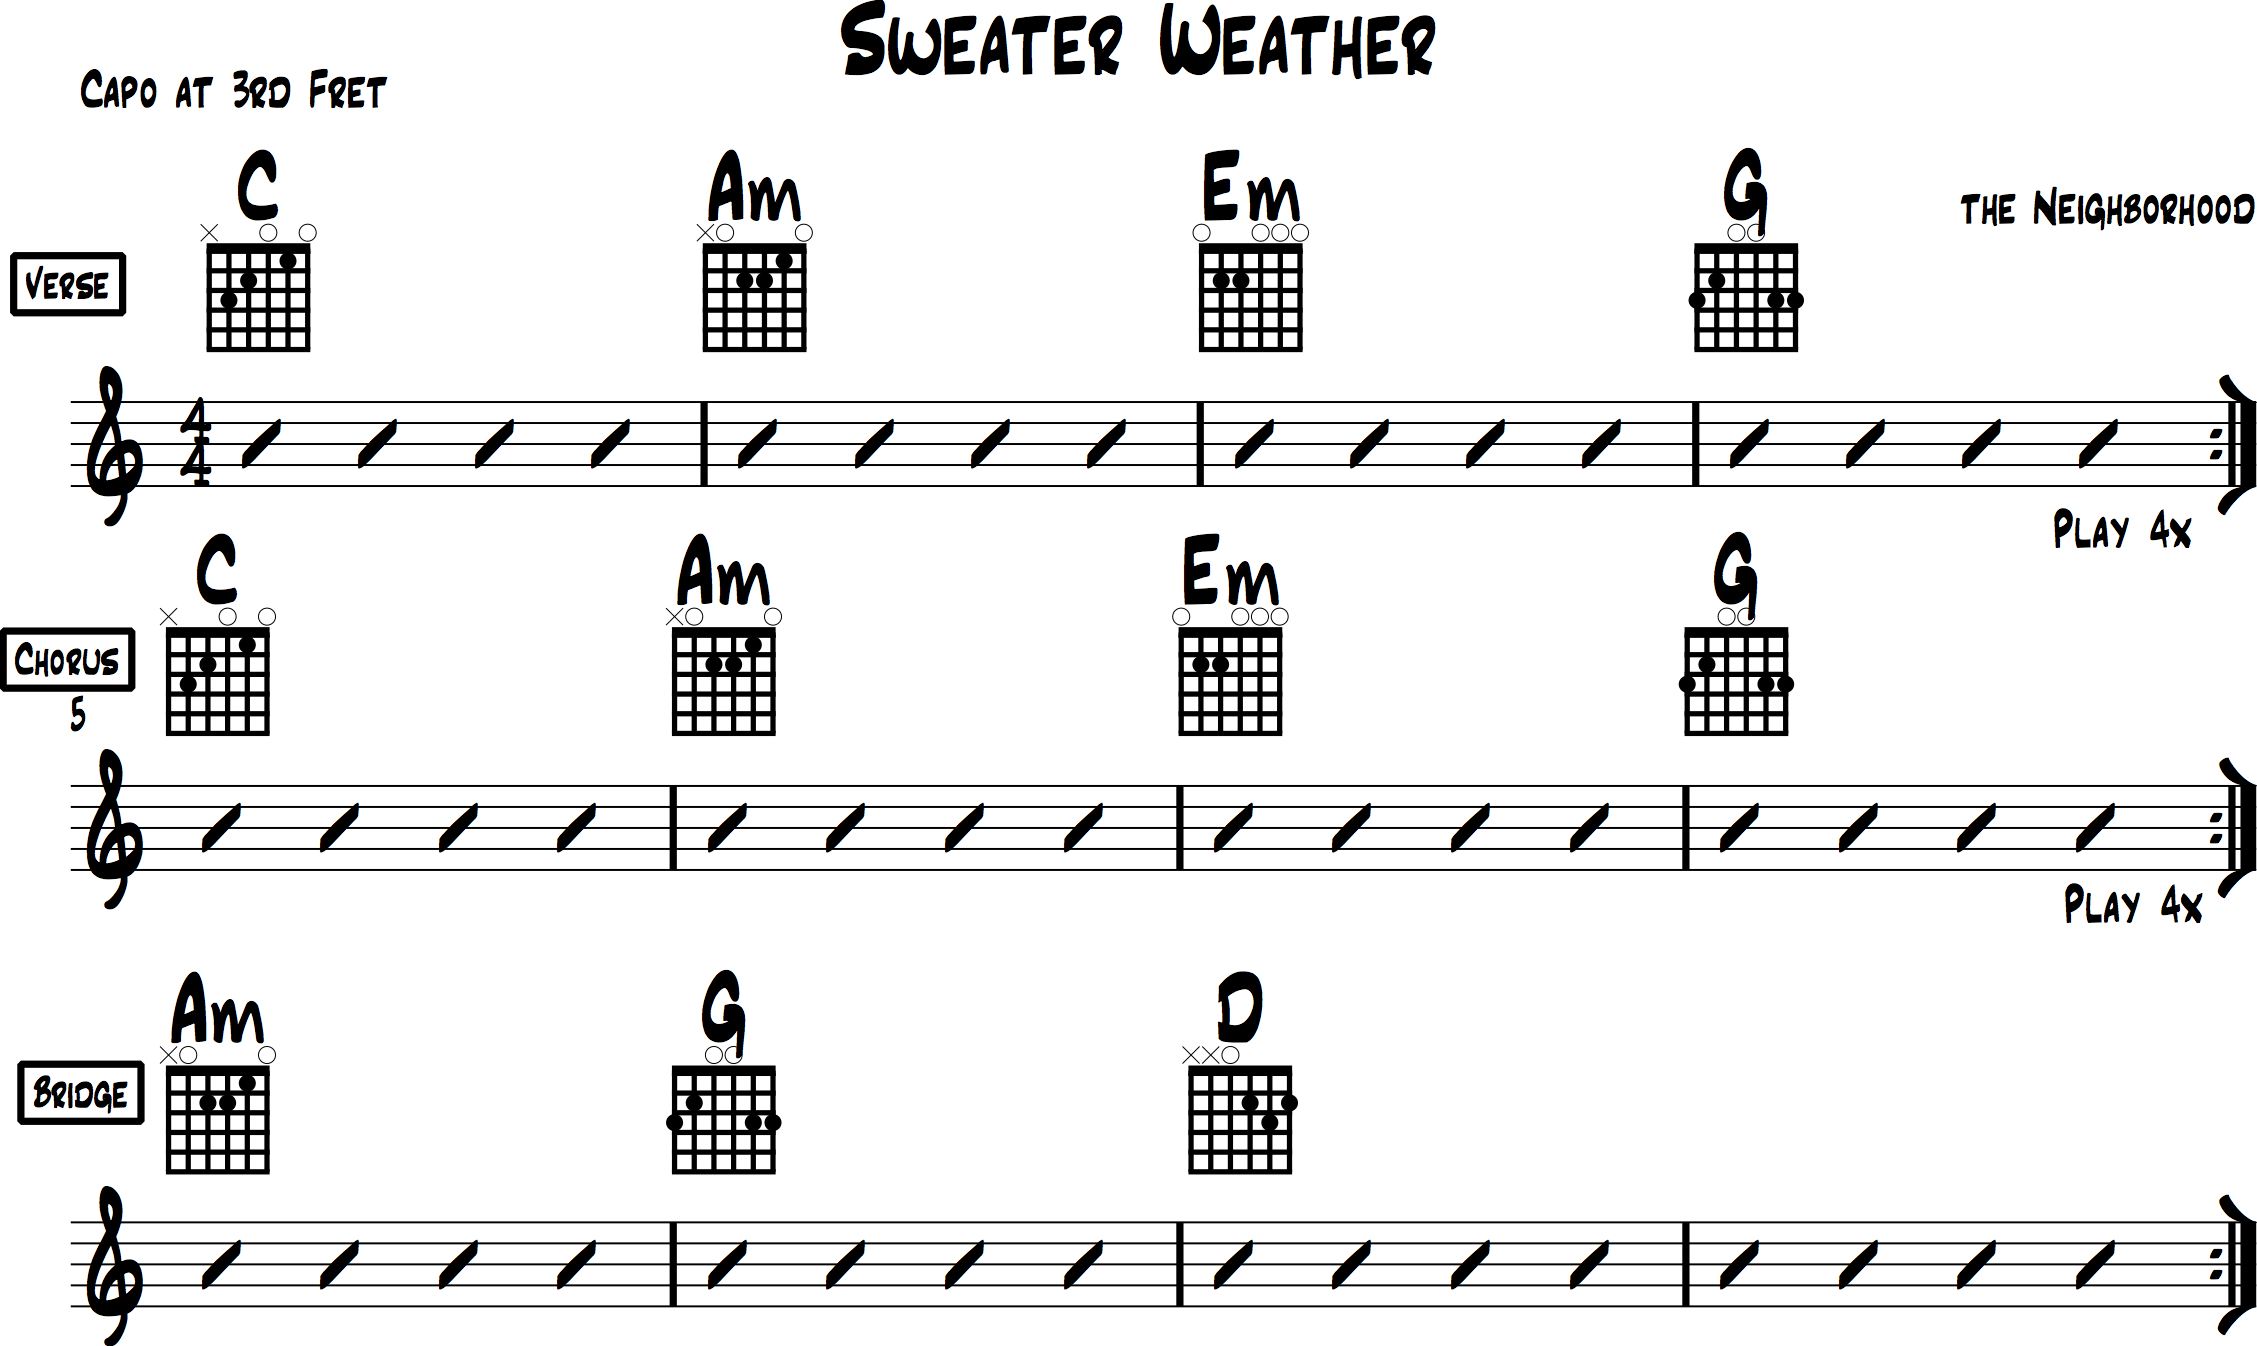
Chord Chart
I’ve included a chord chart, which is a simple road map that shows you:
- The overall arrangement of the song.
- A section by section breakdown of the song.
- Each chord and how long to play it for.
If you don’t read music, please don’t be intimidated. This is a cheat sheet that can help you get through the tune quickly and easily. I find it indispensable for learning songs and I can also hand it to a seasoned musician and they can follow along without any problems.
Song Form
- Verse: 16-bar section; A 4-measure pattern that repeats four times. The progression is C–Am–Em–G with each chord receiving a full measure.
- Chorus: 16-bar section; Same as the Verse.
- Bridge: 4-bar section that repeats; Bar 1, Am for a full measure; Bar 2, G for a full measure; Bars 3 & 4, D for two measures.
Once you become familiar with chord charts, you’ll gonna never want to go back. It’s just easier to see where you’re going when you have a map. And, it’s especially helpful when you’re not familiar with the song or there’s a section of the song that you don’t remember (Bridges and Interludes are notorious for surprising players and derailing a song’s performance). So, heads up, this tune has a Bridge and not only is there a progression change but the texture of the tune and the accompaniment pattern also changes.
Wrap-up
I hope that you’ve enjoyed learning Sweater Weather chords as much as I did in preparing this lesson for you. Thanks for hangin’ with me and I’ll see you next time.
Recommended Articles for You
 Take Me to Church Chords for Beginner Guitar (Hozier)
 The Only Exception Chords for Beginner Guitar (Paramore)
 Iris Chords for Beginner Guitar (Goo Goo Dolls)
 Wake Me Up Chords for Beginner Guitar (Avicii)
 Blank Space Chords for Beginner Guitar (Taylor Swift)
 Hey Soul Sister Chords for Acoustic Guitar (Train)
 I’m Yours Chords Tutorial (Jason Mraz)