Every guitarist, no matter what level or playing style, needs to develop a vocabulary of chords. After all, every song is made up of chords and a melody (sometimes with lyrics) played with a certain rhythm. For this article we’ll take a general look at chords, specifically, open-string guitar chords.
What are open-string guitar chords?
First, we need to understand what chords are and the simple definition is two or more notes played at the same time. As you develop as a guitar player and musician this definition will take on a deeper meaning but, for now, this is a simple definition to help get you started.
What is meant by “open-string” guitar chords?
Simply put, the term means chords that use open strings and are played on the guitar. Chords can be played on a variety of instruments, but a piano, for example, does not have open strings. The nature of the guitar allows for certain “guitaristic” techniques that make the instrument special. In this case, open-string guitar chords offer a different sound and technique that is not available on other instruments. As you become more fluent on the instrument, these guitaristic chords will become part of your vocabulary.
Finally, open-string guitar chords are also referred to by other terms such as first-position guitar chords, open guitar chords, “cowboy” chords, “campfire” chords, etc. Let’s take a look at how chords are written and the various notation systems that we’ll use.
How to Read Chord Diagrams
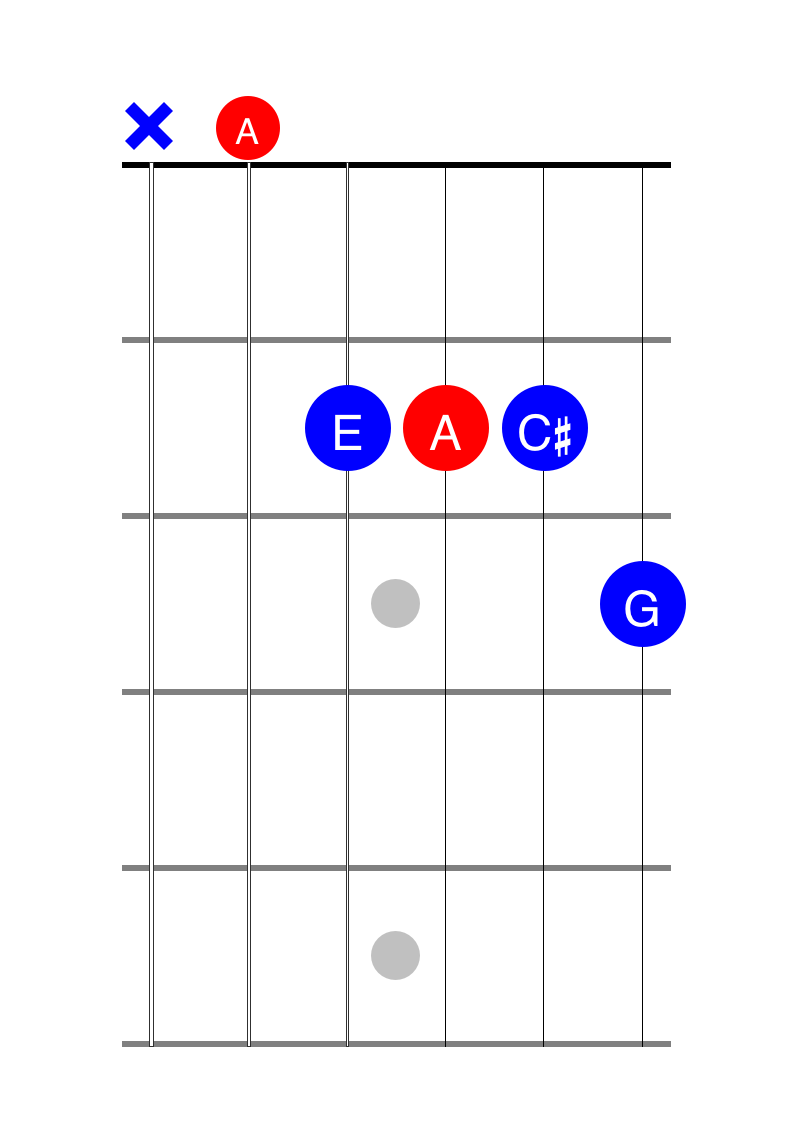
Chord boxes, chord diagrams, and chord grids all mean the same thing. Basically, they refer to the illustrations that are used to present a quick and easy way to notate chords. Each diagram represents a section of the guitar’s fret board.
The bold, horizontal line at the top of the diagram represents the nut and the horizontal lines that follow below the nut point out the frets. The vertical lines describe the strings: the line to the left represents the 6th string, low E, and the line all the way to the right illustrates the 1st string, high E.
The “X” above the nut indicates that you shouldn’t play that string (you either avoid it or mute it). And, the “O” means that you play that string open.
In some cases, you’ll see a red dot, or a red circle with the number or note name inside. The “red” indicates that it is the root of the chord (or scale). The note name sometimes appears inside the circle and the number tells you which finger to use.
Don’t worry, this will become second nature to you fairly quickly.
How to Read Standard Notation
The standard notation system is how music is traditionally written and archived. It consists of a five-line staff and the notes are represented by note heads (dots) and stems (flags). There are many rules that apply to this system and are beyond the scope of this article. For more information on this system please see our article on reading clefs or search “how to read standard music notation.”
[su_box title=”Author’s Note” box_color=”#691c84″ title_color=”#fefefe” radius=”0″ class=”width: 200px;height: 400px;”]I believe in using both conventions when notating music examples. This way, the student gets familiar with seeing both methods and their similarities. It is recommended that you look at both conventions even if you don’t understand them. Music has a shape to it when written down—if the notes move up the notation reflects that and likewise if it moves down. Follow the shape as you listen to the music and you’ll find standard notation less intimidating.[/su_box]
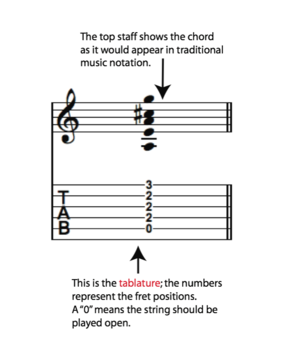
How to Read Tablature
The tablature system, or TAB, has been around for centuries. It first appeared formally during the Baroque period and was used to notate lute music. Modern music notation has since adopted this system for contemporary and popular guitar music and, over the past few decades, this system has become somewhat standardized.
The six-line staff represents the six strings of the guitar. The numbers illustrate the frets that need to be pressed. A zero “0” indicates that that string should be played open and an “X” tells you to mute that string.
There are many other rules to this system however, this should be enough to get you started. The other symbols will need little explanation and, in many cases, will be self explanatory.
In the next section we’ll look at some examples of open-string guitar chords for various playing levels.
Absolute Beginner
If you’re just starting out, playing the guitar can be fun, exciting, and also overwhelming. You begin with some basic exercises but want to play songs as soon as possible. Here are some fundamental examples that will help you strengthen those finger muscles and develop coordination in both hands while learning something that you can actually play and enjoy.
Example 1: One-Finger, Open-String Guitar Chord Exercise
Take a look at the music example below. Don’t worry if you don’t know how to read music. You can follow along as you listen to the example.
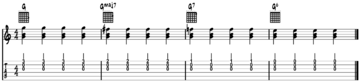
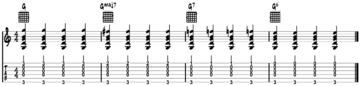
There are 4 chords.
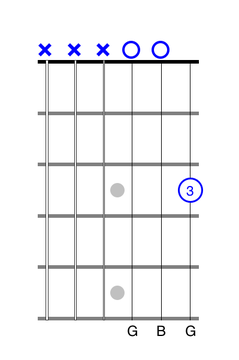

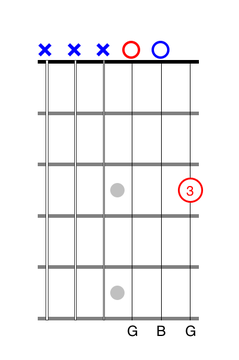
- The first chord is a G chord and will be played with the 3rd finger on the 1st string, 3rd fret. As you fret that note, strum the top 3 strings. Use down strums and strum each chord 4 times. Try to keep a steady rhythm.
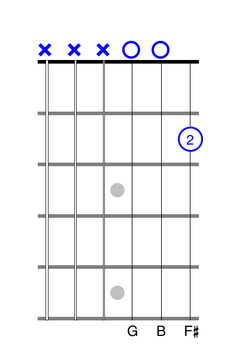
- The next chord is a Gmaj7 chord. I don’t expect you to know the names, or what they mean, at this time. I do this to make you aware of the fact that there is a name or proper term for everything that we do when learning how to play the guitar. The Gmaj7 chord is played using your 2nd finger on the 1st string, 2nd fret. Same as before, strum the top 3 strings. Use down strums, strum each chord 4 times and maintain a steady rhythm.
- The next chord is a G7 and this is played using the 1st finger on the 1st string, 1st fret. Use down strums, strum each chord 4 times and maintain a steady rhythm.
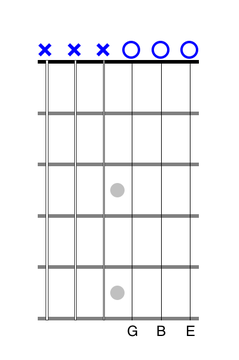
- The last chord is a G6 and this chord is played by strumming the top 3 open strings. And, as before, use down strums, strum each chord 4 times and maintain a steady rhythm.
- You can repeat this cycle as often as you wish and finish with the first chord, the G.
Here’s a tip:
You can create your own variations on this: strum each chord 8 times, 2 times, etc.
Example 2: Two-Finger, Open-String Guitar Chord Exercise
Many of you have noticed that the tricky part to playing chords is switching from one chord to the next. Or, more specifically, maintaining a steady rhythm while switching chords. This next example offers you a chord-switching technique that will help you develop a few tricks:
- Switching chords without looking.
- Feeling your way from chord to chord.
- Strengthening your fingers.
- Developing finger independence.
The approach is called The Common-Finger Technique. In this example, notice that each chord has one thing in common: the 6th string, 3rd fret played by the 3rd finger. This finger is common to all four chords. The trick to developing this technique is to “anchor” that 3rd finger to the 6th string, 3rd fret and not move it at all.
In this manner, you can feel your way from the:
- 4th finger on the 1st string, 3rd fret; to the,
- 2nd finger on the 1st string, 2nd fret; to the,
- 1st finger on the 1st string, 1st fret; to the,
- 1st string, open for the G6, our final chord.


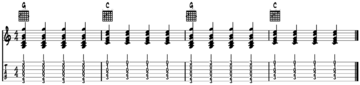
Example 3: One-Finger G and One-Finger C Chord, Open-String Guitar Chords Exercise
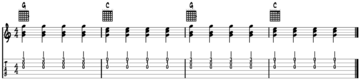
In this next example we’ll use the same techniques from the previous exercises. Here we’ll repeat the one-finger G chord that we learned in example 1 and add the one-finger C chord. These are two open-string guitar chords that go together quite nicely and appear together in many, many songs.
Let’s review the one-finger G chord. This chord is played with the 3rd finger on the 1st string, 3rd fret. As you fret that note, strum the top 3 strings. Use down strums and strum each chord 4 times.
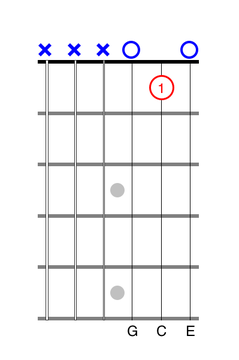
Next, we’ll learn the one-finger C chord. This chord is played with the 1st finger on the 2nd string, 1st fret. As you fret that note, strum the top 3 strings making sure that the 3rd and 1st strings sound clear. If you hear any buzzes or odd noises then you probably need to re-position your fretting finger. Use down strums and strum each chord 4 times.
Example 4: Two-Finger G and Two-Finger C Chord, Open-String Guitar Chords Exercise

As we begin to add fingers (and notes) you’ll notice that the chords begin to sound fuller. This next example introduces another chord-switching method called The Pivot-Finger Technique. There are two reasons for using a pivot finger:
- for notes on the same string, or
- for notes on the same fret.
Here’s how it works:
In this exercise will be focusing on the 2nd approach; i.e., notes on the same fret. Take a look at both diagrams side by side.
- Look for notes in common: in this case, the 3rd string, open; and, avoid the 6th string.
- Identify the movement, see it before you do it. In this case, the 2nd finger moves from the 5th string, 2nd fret to the 4th string, 2nd fret.
- “Pivot” the 2nd finger from the 5th string to the 4th string. “Feel” your way from one string to the next.
- At the same time that you execute the 2nd-finger pivot, you need to lift the 3rd finger from the 1st string, 3rd fret and press the 1st finger onto the 2nd string, 1st fret.
As you can see, there’s a lot of moving parts to switching chords—even when they are using open strings.
If you’re having trouble then review the chords from bottom to top.
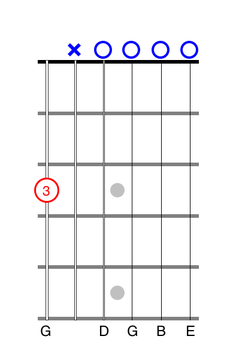
For the two-finger G, open-string guitar chord:
- 6th string: Do not play.
- 5th string: Use the 2nd finger to play the 2nd fret.
- 4th string: Play open.
- 3rd string: Play open.
- 2nd string: Play open.
- 1st string: Use the 3rd finger to play the 3rd fret.
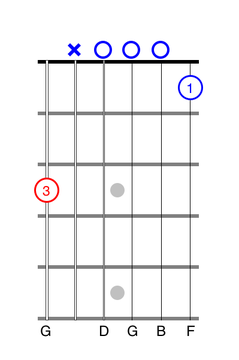
For the two-finger C open-string guitar chord:
- 6th string: Do not play.
- 5th string: Do not play
- 4th string: Use the 2nd finger to play the 2nd fret.
- 3rd string: Play open.
- 2nd string: Use the 1st finger to play the 1st
- 1st string: Play open.
Example 5: Three-Finger G and Three-Finger C Chord, Open-String Guitar Chords Exercise
We may refer to these as three-finger chords but they are simply the full, open-string guitar chord versions of G and C.
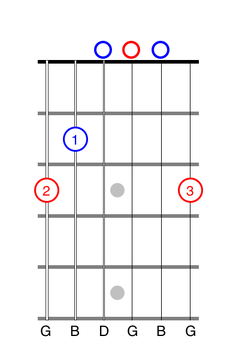
As in the previous example, building the chords from the bottom up is the best way to check that you are playing the chords correctly. Notice that we have a slightly different fingering for the G chord than in the previous example.
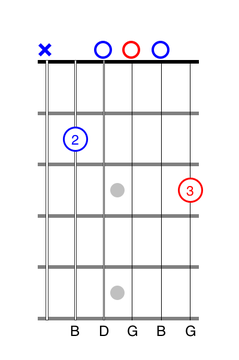
The three-finger G, open-string guitar chord:
- 6th string: Use the 2nd finger to play the 3rd
- 5th string: Use the 1st finger to play the 2nd fret.
- 4th string: Play open.
- 3rd string: Play open.
- 2nd string: Play open.
- 1st string: Use the 3rd finger to play the 3rd fret.
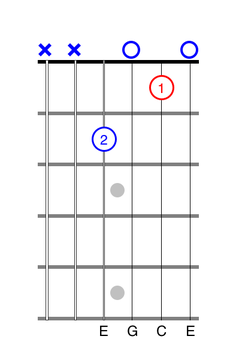
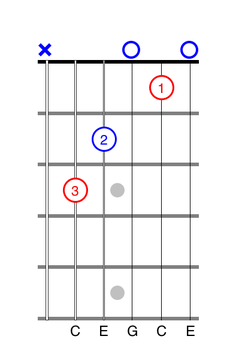
The three-finger C, open-string guitar chord:
- 6th string: Do not play.
- 5th string: Use the 3rd finger to play the 3rd fret.
- 4th string: Use the 2nd finger to play the 2nd fret.
- 3rd string: Play open.
- 2nd string: Use the 1st finger to play the 1st
- 1st string: Play open.
These last two open-string guitar chords are two of the most popular chords that you will learn. They appear in countless songs and, quite often, appear together. If you’re just starting out then you’re off to a great start. There are still many more chords to uncover, many strumming techniques to discover and a whole lot of enjoyment ahead. Take your time and have fun. Thanks for allowing me to be a part of your musical journey.
Recommended Articles for You
 Open-String Guitar Chords: Introducing the CAGED Chords
 Can’t Buy Me Love Chords: 3 Open-String Minor Chords in Action
 Easy Guitar Chords and How to Play Them
 Thinking Out Loud Chords for Beginner Guitar (Ed Sheeran)
 I’m Not the Only One Chords for Beginning Guitar (Sam Smith)
 Love Yourself Chords for Beginner Guitar (Justin Bieber)
 Hey There Delilah Chords for Acoustic Guitar (Plain White T’s)